Hello there! Today, I’ll show you how to create a super cool eyeliner style called the ‘Bat Wing.’ It’s a modern twist on the classic winged eyeliner that you can rock at parties or even on Halloween.
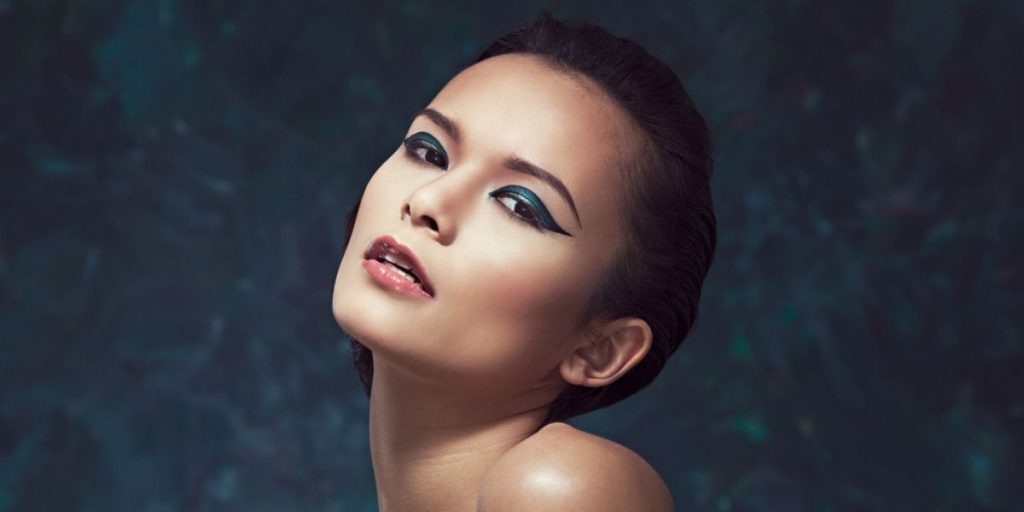
So, what’s the ‘Bat Wing’? Well, it’s all about making your eyes look like a bat’s wing – that cool, swoopy shape. This style was invented by a famous makeup artist named Katie Jane Hughes. It’s especially great if you have hooded eyes because the regular winged liner might disappear into the folds. But with the ‘Bat Wing,’ you’ll get a lifted cat-eye look that suits you perfectly.
The best part? This style emphasizes your natural eye shape and makes your eyes look wide and lovely. Ready to learn how to do it? Keep reading for our easy step-by-step guide to the Bat Wing Eyeliner.

How to Make Bat Wing Eyeliner
If you’re tired of the same old eyeliner look and want something edgy or perfect for Halloween, the bat wing eyeliner is your go-to choice. It’s a bit different from the regular cat-eye liner and adds a touch of drama to your makeup.
Now, let me break it down for you. Unlike the cat-eye liner, which is a straight line from the outer corner to the inner corner of your eye, the bat wing liner takes a more adventurous path. It starts at your eyelid’s crease and curves down like a letter ‘C’ to meet your lash line.
The great thing about the bat wing liner is that it’s easier to pull off, especially if you have hooded eyelids. So, if you’re up for trying something new, follow this step-by-step guide to nail the bat wing eyeliner look.

Let’s make your eyes pop with a fabulous bat wing eyeliner! Here’s a simple 6-step guide to get that stunning look:
Step 1: Get Your Eyelids Ready
Think of your eyelids as a canvas, and we want to make it the best canvas possible for your eyeliner art. This is where eyeshadow primer comes in. It’s like a special cream that you apply to your eyelids. It does two important things:
A. Creates a Smooth Surface: The primer makes your eyelids nice and smooth, just like a fresh piece of paper. This is important because it helps your eyeliner go on more evenly, and it also hides any little bumps or lines on your eyelids.
B. Keeps Your Eyeliner in Place: Once you’ve drawn your bat wing eyeliner, you don’t want it to smudge or fade during the day. The primer is like a guardian that helps your eyeliner stay put, so it looks just as awesome in the evening as it did when you first applied it.
Step 2: Dust on Some Powder
Now that we’ve applied the eyeshadow primer, it’s time to make it even better with a little bit of powder. This powder can be either a loose translucent powder or a compact one, like what you use for your face.
- Setting the Primer: By gently applying this powder over the primer, you’re setting it in place. It’s like putting a seal on your canvas to make sure it stays smooth and ready for your eyeliner.
- Preventing Smudging: The powder also helps prevent your eyeliner from smudging or moving around. Think of it as a barrier that keeps the eyeliner in the right place on your eyelid and prevents it from wandering onto your brow bone or elsewhere.
So, in easy words, by using primer and powder, you’re preparing your eyelids for the bat wing eyeliner, making it look smoother, and ensuring your eyeliner stays put all day. It’s like giving your eyelids a little makeover to help your eyeliner art shine and stay in place.

Step 3: Draw a Basic Shape of Your Winged Eyeliner
Imagine you’re an artist creating a simple sketch. Here, instead of using a paper and pencil, you’ll be using makeup to create a basic shape for your winged eyeliner.
- Choose Your Tool: You can use a soft pencil eyeliner or an eyeshadow brush with an angled tip. The idea is to pick a tool that’s comfortable for you to use.
- Start with the Wing: Begin by drawing the outer wing of your eyeliner. It’s like drawing a small line that extends out from the corner of your eye, giving it that classic winged look.
- Make a Dotted Line: To guide your hand and ensure you’re on the right track, create a series of small dots or dashes along the desired wing shape. These dots will serve as markers for the shape you want.
- Connect the Dots: Now, carefully connect the dots, joining them to form a smooth line. The pencil eyeliner is a great choice because it’s easy to work with and allows for more control.
- Adjust and Refine: Take your time to adjust and refine the wing until you’re happy with how it looks. If you’re aiming for a creative, Batman-inspired wing, this is your chance to get it just right.

Step 4: Outline Your Eyeliner
Once you have the basic shape of your winged eyeliner, it’s time to outline it to make it stand out.
- Choose Your Eyeliner: Use your favorite eyeliner for this step. You can opt for a liquid eyeliner, gel eyeliner, or any type you’re comfortable with.
- Start at the Inner Corner: Begin by applying the eyeliner at the inner corner of your eye. This is the point where your eyelashes start.
- Create Thin Lines: When outlining, make sure to keep the lines thin and close to your lash line. This is like creating an outline for a picture, and thinner lines are easier to manage.
- Work Your Way Out: Slowly move from the inner corner towards the outer wing. Follow the shape you created in the previous step.
- Take Your Time: Don’t rush this process. By making thin lines, you minimize the chances of making a big mistake. Plus, if you do make a small error or smudge, it’s easy to fix without having to redo your entire makeup look.

Step 5: Adding the Details
Now that you have your basic eyeliner outline in place, it’s time to fill in the rest of your eyeliner design. Here’s how you can do it:
- Choose Your Eyeliner: Decide whether you want to use a pencil, gel, or liquid eyeliner. Each has its own benefits. Pencils are great for a softer look, gels provide more control, and liquids can give you sharp, precise lines.
- Apply Slowly: Start at the inner corner of your eye and move outward along your lash line. Take it slow, and use short, small strokes. This helps prevent mistakes and gives you better control.
- Avoid Overdoing It: It’s easy to use too much eyeliner, which can make it smudge or look messy. So, be mindful not to layer it on too thickly.
Step 6: Fixing Mistakes
If your eyeliner isn’t perfect, don’t panic! Here’s how to fix any smudges or stray lines:
- Cotton Swab and Makeup Remover: If you notice any uneven lines or smudges, take a cotton swab (those little sticks with a soft tip) and dip it in makeup remover. Gently swipe over the areas that need fixing. This will clean things up and make your eyeliner look even.
- Eyeshadow Brush and Concealer: Alternatively, you can use an eyeshadow brush with a bit of concealer on it. Carefully blend the concealer over any spots that need correction. This will help create a clean and smooth finish.
- Softer Look: If you prefer a less dramatic look, you can use your eyeshadow brush with the same eyeshadow color you used earlier. Blend this color into your eyelid crease, softening the lines.
- Liquid Eyeliner Alternative: If you find using liquid eyeliner challenging, no worries! There’s a beginner-friendly technique you can explore. This method might be simpler and more comfortable for you.
Easy Bat Wing Eyeliner: Perfect for Beginners!
If you’re new to eyeliner, don’t worry! Let’s talk about creating a cool bat wing look in a simple way.
First, you can use colorful eyeshadow or an eye pencil instead of a liquid liner. They’re more forgiving if you make mistakes. So, you can practice without stress.
To make that striking bat wing, you can use tape. Yep, regular tape! Stick it at an angle under your lower lashes. Then, draw your eyeliner along the edge of the tape.
Next, make a second line from the tip of your wing towards the inside corner of your eye. It’s like making a little ‘c’ shape.
Now, gently connect the second line to the base of your eyelashes. Voilà! You’ve got a bat wing.
To make it look more natural, use an eyeshadow brush to soften the color a bit. Finish up with some mascara, and you’re ready to rock your day!
And hey, if you’ve got hooded eyes and want that perfect winged look, the bat wing eyeliner is your hero. It’ll make your eyes look awesome!

Get Stunning Bat Wing Eyeliner for Hooded Eyes!
Let’s talk about a cool eyeliner trick for folks with hooded eyes. Hooded eyes are when your eyelids are a bit covered by extra skin, making it tricky to pull off a regular winged eyeliner look.
But don’t worry, there’s a solution called “bat wing eyeliner” that’s just perfect for you. It’s like a sharp, cool wing that doesn’t disappear in the crease.
Here’s how to do it:
- First, grab a brown or black pencil. Draw a line from the inside corner of your eye to the outside corner, making sure it’s nice and smooth.
- Next, follow along that line and make two or three little jagged, bat-like shapes.
- Draw a second line from the tip of the bat wing to your eyelid crease. Then, add another little bat wing shape connecting the second line to the base of your eyelashes.
- Now, grab some liquid eyeliner and go over your bat wing for a sharp and long-lasting look.
- To finish it off, add some shimmery eyeshadow and mascara to make your eyes pop.
If you have double eyelids, you can get even more creative with your bat wing for an extra wow factor.
Get Creative with Bat Wing Eyeliner for Double Eyelids
Double eyelids are when your eyelids have a little fold in them. Unlike hooded eyelids, they don’t have extra skin and fat, so you can see the crease on the upper eyelid clearly.
If you have a good amount of space between your eyes and brows, you can have fun with bat wing eyeliner. Here’s how:
1. Extend your eyeliner into the crease of your eyelid to create a unique bat-wing look.
2. Make the wing pop by adding some sparkly liner above your crease and a touch of eyeshadow to make it look even cooler.
3. If you’re feeling adventurous and want to rock some bat-wing eyeliner for Halloween, keep reading for a special technique in the next part.
How to Create Spooky Bat Wing Eyeliner for Halloween
If you’re a big fan of vampires and want to flaunt your makeup skills this Halloween, I’ve got just the thing for you: Bat Wing Eyeliner. This creative makeup style combines red and black to give you that perfect eerie look and transform you into a vampire princess.
Here’s how to do it:
- Start with clean eyelids, and apply a bit of eyeshadow primer. This helps your makeup stick and stay put.
- Use a light-colored eye pencil to draw the outline of the bat wing shape. Make sure it’s spooky and dramatic!
- Add as many spooky details as you like within the wing outline. Get creative!
- Now, grab a liquid liner to go over your pencil lines. This seals the look and makes it last.
- To add depth and dimension, apply some red eyeshadow to your bat wing.
- Don’t forget the inner corners of your eyes. Line them with red too, and even your lower lashes for some extra drama.
- Put on some mascara to make your lashes pop, and consider adding false lashes for that extra wow factor.
- Finally, spray on some setting spray. This will keep your masterpiece in place all night long as you enjoy your Halloween festivities.
So, get ready to rock that spooky vampire look with your bat wing eyeliner this Halloween! Have fun and shine bright like the night!

In conclusion, the Bat Wing Eyeliner is a creative and versatile makeup style that offers a fresh take on the classic winged eyeliner, perfect for various occasions, from everyday wear to Halloween extravaganzas. This eyeliner technique, popularized by makeup artist. is particularly suitable for those with hooded eyes, as it accentuates the eyes, giving them a lifted cat-eye look.
This easy step-by-step guide breaks down the process, beginning with preparing your eyelids with primer and powder to ensure a smooth canvas for your artistry. The guide then takes you through the essential steps, from drawing the basic wing to outlining, adding details, and fixing any mistakes. It also offers an even simpler approach for beginners and provides tips for those with double eyelids. Additionally, it explores how to create a spooky Bat Wing Eyeliner perfect for Halloween makeup, combining red and black for an eerie and striking look.
So, whether you’re a makeup enthusiast or looking for a unique style for a special occasion, the Bat Wing Eyeliner offers a fun and creative way to enhance your eye makeup and stand out in style.
FAQs
What is the Bat Wing eyeliner, and how does it differ from traditional winged eyeliner?
The Bat Wing eyeliner is a unique eyeliner style that takes inspiration from a bat’s wing. It differs from traditional winged eyeliner by starting at the eyelid’s crease and curving down like the letter ‘C’ to meet the lash line.
Who is the makeup artist credited with inventing the Bat Wing eyeliner, and why is it particularly beneficial for people with hooded eyes?
The Bat Wing eyeliner was popularized by makeup artist Katie Jane Hughes. It is especially beneficial for people with hooded eyes because it creates a lifted cat-eye look that suits their eye shape.
What is the purpose of using eyeshadow primer when applying Bat Wing eyeliner?
Eyeshadow primer serves two main purposes: it creates a smooth surface on the eyelids for even eyeliner application and helps the eyeliner stay in place without smudging or fading.
How does applying powder over the primer help in the Bat Wing eyeliner application?
Powder helps set the primer in place, ensuring a smooth canvas for eyeliner application. It also acts as a barrier to prevent eyeliner from smudging or moving around during the day.
What are the steps for drawing the basic shape of Bat Wing eyeliner?
Start by drawing the outer wing of the eyeliner, creating a small line that extends from the corner of the eye. Use dots or dashes to guide the shape and then connect them to form a smooth line.
What are the recommended tools for drawing the basic shape of the Bat Wing eyeliner?
You can use a soft pencil eyeliner or an eyeshadow brush with an angled tip to draw the basic shape of the Bat Wing eyeliner.
How do you fix smudges or stray lines in Bat Wing eyeliner?
To fix smudges or stray lines in Bat Wing eyeliner, you can use a cotton swab dipped in makeup remover or an eyeshadow brush with concealer. This helps clean up and correct any mistakes.
For beginners, what alternative methods can be used to create a simple Bat Wing eyeliner look?
Beginners can use colorful eyeshadow or an eye pencil, which are more forgiving. Tape can also be used to create a Bat Wing shape, making it easier to draw the eyeliner.
How can individuals with hooded eyes create the perfect Bat Wing eyeliner look?
People with hooded eyes can create the perfect Bat Wing eyeliner by drawing a line from the inside corner of the eye to the outside corner and adding jagged, bat-like shapes. Liquid eyeliner can be used for a sharp and long-lasting look.
What are some creative options for individuals with double eyelids to enhance their Bat Wing eyeliner look?
People with double eyelids can extend their eyeliner into the crease of the eyelid, add sparkly liner above the crease, and use eyeshadow to create a unique and creative Bat Wing eyeliner look.